RECIPE: Caribbean Shrimp

RECIPE: Caribbean Shrimp

Caribbean Shrimp

Serves 6 – 8 || Preparation with cleaning 1 hour

2 lbs. cleaned medium sized shrimp (deveined)

1 tsp powdered ginger, + 4 Tb juice of freshly grated

1 tsp allspice

1 – 2 tsp Jamaican curry

2 large garlic cloves, diced (save half for pan)

2 scallion, diced (save half for pan)

Sprigs of fresh thyme, or 1 tsp dried thyme

1 Tbsp honey or lemon syrup

1 Tbsp soy sauce

1 Tbsp coconut oil

**1 Tbsp Jamaican Jerk Seasoning (or hot pepper)

Salt & pepper to taste

 2 Tb Jamaican Pickapepper sauce (can be substituted with tamarind or Worcestershire sauce)

¼ cup chopped mint

¼ cup chopped cilantro

Zest of a lemon and an orange

 —————

Wash the shrimp and dry. Mix all the other ingredients together and add to shrimp. Leave to marinade for at least an hour in the refrigerator, better overnight and up to two days. This allows the marinade to soak in, really enhancing the flavors. Never leave seafood on the counter.

In a frying pan, use coconut oil, add the stems of parsley, diced garlic and scallion, more grated ginger and fresh thyme. Add the shrimp a few at a time, removing and replacing as you go along, until all are ready. Do not overcook as you want the shrimp to be firm but moist, and not dried out. At the end place all of the ingredients back into the pan and add any of the remaining marinade. Keep warm. Serve over rice or pasta and sprinkle with parsley or a mixture of mint and cilantro.

** If you can’t find Jerk Seasoning combine 2 tbsp. of each of the following ground ingredients:

Thyme                       Black Pepper            Coconut Oil to moisten

Allspice                     Garlic Powder

Ginger                       Onion Powder

Nutmeg                      Zest of Lime

Cinnamon                 ¼ cup Juice of lime or vinegar

**If you can’t find allspice add ½ tsp more of the following ground spices: the cinnamon, nutmeg and ginger.

WhatsApp Image 2021-01-13 at 1.22.40 AM.jpeg

RECIPE: Lentil Soup

RECIPE: Lentil Soup

I am not sure why Italians eat lentils on New Year’s Eve for good luck in the coming year with pork (Cotechino) added to the dish. In Jamaica I do remember that we eat pork, and we had to go to church. No parties in my family because the saying is, paraphrasing of course, that you should end the year the way you want the new year to go. So, I don’t know how other Jamaicans celebrated. When I lived in Spain, I remember that Spaniards celebrated by eating as many grapes as possible during the twelve strokes of Midnight. Recently I have learned that African Americans (West African tradition) and the Scottish who came to American have the tradition of eating black-eyed peas. If we have this tradition in Jamaica, I am unaware as it has been quite a number of years since I last spent a New Year’s Eve there.

So, in my home we follow the Italian tradition, and really only because I add a lot of pork to it and always save the hambone from Thanksgiving that I freeze. This is added to my lentils for our New Year’s Eve dinner. My children and I love the pork, while my husband, who only eats lentils at this time does it for the good fortune. I actually do like lentils and always order them when in France. Perhaps that can explain why I only buy French lentils.  

I hope you enjoy this recipe, and know that I love extras, because they are so, so very good over a bed of rice. Tasty!!!! Happy 2021 to all and wishing you, health and much happiness!!!


Lentil Soup

Preparation: 15 minutes || Cooking: 45 minutes – 1 hour but depends on the type of lentils being used. 

8 oz. of dried lentils, washed and drained

2 Tbsp olive oil

2 medium carrots, diced

1 celery stalk, diced

1 medium zucchini, diced

2 stalks of scallion, diced

1 medium white or yellow onion, diced

1 large garlic clove, diced

4 oz. pancetta, diced (optional)

4 cups of vegetable broth

Salt & pepper to taste

1 hot pepper, whole

4 – 6 Bay leaf

Parsley, chopped and stems saved and chopped separately

 ———-

1.     In a large pot heat the olive oil and sauté together the carrots, garlic, scallion, celery, zucchini, onion, parsley stems, and pancetta for about 2 minutes. Do this until the carrots begin to soften, adding about ¼ cup of broth to not brown too much the vegetables.

2.     Add the lentils, bay leaf and the hot pepper, keep stirring. Salt and pepper to taste. Cook for approximately 10 minutes.

3.     At this point add the remaining broth. Bring to a boil. Lower the heat to a simmer and cook for about 40 minutes covered until the soup thickens somewhat. Remove the hot pepper if desired. 

4.     Serve the soup in bowls, sprinkle with chopped parsley, and a little olive oil and freshly ground pepper if desired. 


Note:   

My favorite lentils to use are the French lentils. You can use any type of lentil but cooking time may vary as will how much liquid you need as lentils do soak up a lot of the broth.

I make enough lentils to serve at lunch on New Year’s Day. On New Year’s Eve I prepare a special Italian sausage called Cotechino (prepare according to packaging), which I slice and serve over the lentils. In this case I make a thicker, and less soupy lentil dish. So, decrease the amount of broth used in that preparation.


WhatsApp Image 2020-12-31 at 12.01.57 AM.jpeg

Recipe: Farfalle with Sun-dried Tomatoes and Pistachios

Recipe: Farfalle with Sun-dried Tomatoes and Pistachios

Farfalle with Sun-dried Tomatoes and Pistachios

Preparation: 30 minutes || Serves: approximately 12

This is one of the easiest pastas to make. There is nothing to it if you have a food processor. Of course, if you are a purist, do pull out your mortar and pestle and grind away manually. Pestos are great, because with a few simple ingredients and a whir or two, you are done.

Years ago – about 25 - when we first moved back to New York City and I followed the then new Food Channel, there was a program in which a Californian – so forward thinking when it came to cooking traditional Italian -, I believe, created a sun-dried tomato pesto, but using almonds as an alternative to the pine nuts, and… substituted half the olive oil with chicken broth. I have to say that I didn’t know where to look at that point – chicken broth in pesto took me out of my comfort zone. However, I loved the idea of sun-dried tomatoes, which at the time I hadn’t yet come across, not even in Italy.  So, I decided to try it, but used pistachios, which is preferred in my household. One of the reasons why I use walnuts in my chocolate cake, instead of the more well-known almond in the Caprese cake.  That, however, is another story.

 This is a fantastic paste with any remaining pesto to be used on crostini or a tablespoon dropped into vegetable soup or spread on a wrap or leftover bread with mozzarella and placed under a grill. It is just very, very versatile, and the taste is splendid like the sun. This is one of the favorite pastas that people don’t mind repeating and I use quite often for parties. It can be made a few days ahead and placed in the refrigerator. The amount is enough for 3 – 3 ½ lbs of pasta. An extraordinary substitute for the farfalle for a pesto is the simple orecchiette, literally little ears or a long fusilli like pasta called Ferricelli. That would definitely be an Italian first choice with this dish.

 Remember also to think about who your guests are. The amount of pasta will depend on how many people you are serving and if you know them well enough to know the quantities they might consume. You don’t have to use all the pesto for the pasta if you are serving a smaller portion. The hot cooking water will make the paste creamier and you can if you still feel it is too dry, add a little crude oil at the end. Actually, it won’t be necessary if you use the water. Also depending on how much basil, as well as if you use sun-dried tomatoes under oil or freshly dried, you use the color of the sauce can go towards green or red in coloring. No matter the color the flavor is always spectacular. Use a really good olive oil as in a pesto it really makes a difference.


2 lbs pasta (for a party I would use 3 – 3 ½ lbs)

2 bottles approximately 8 oz of sun-dried tomatoes under oil, pour out oil in bottles

3 cups basil, washed and dried

1 large clove of garlic, cut in half

1 cup pistachios, ½ for the sauce and ½ to toss in at the end

¾ cup extra-virgin olive oil

salt and pepper to taste

¾ cup grated parmigiano, 1 cup or more, extra to be served at the table

½ cup grated pecorino romano

  1. In a food processor add all of the ingredients except for the cheese. Add the olive oil as needed. Taste for salt, but remember you are adding cheese. I prefer to let people add salt or additional cheese at the table. Spoon the pesto into a container with an airtight cover. Add the cheese and mix in well. Don’t overdo. Italians always like to add more cheese. I used to get a bit worried when they did, as that can be a sign that they think the dish needs a little extra something. At times I just pour the additional pistachios on top and seal, as I can be forgetful and may find that I can’t find the extra pistachios until after the meal is over. Then, somehow, they just present themselves from wherever they were hiding all along. Cheeky.

  2. In the meantime, put the water on to boil. When it boils, add the salt to the water. When the water returns to a boil, add the pasta and let cook following the instructions on the box. Remember it should be al dente. Take seriously into consideration that especially with a pesto you will need to stir rapidly the drained pasta with the sauce for a few more minutes before serving to make it a bit creamier in texture, and to maintain the heat of the pasta when it arrives at the table. So, you may want to cut down by a minute or so on the actual cooking time. I would set aside approximately 1 – 2 cups of pasta liquid. You won’t need it all but better to be safe than sorry. Do check for salt halfway through the cooking process. 

  3. Before pouring the pasta into the serving platter add additional pistachios and stir in. Leave pistachios to scatter on top and serve immediately, and don’t forget a beautiful cluster of basil leaves on top. I like to serve it in a white bowl so you get the colors of the Italian flag – green white and red!

Sun dried tomatoes!!

Sun dried tomatoes!!

Final result!

Final result!

Recipe: Mixed Mushroom Soup with Chickpeas and Chestnuts

Recipe: Mixed Mushroom Soup with Chickpeas and Chestnuts

Mixed Mushroom Soup with Chickpeas and Chestnuts

Preparation: 15 minutes || Cooking: 25 minutes

1 ½ lbs of fresh or frozen mixed mushrooms (portabello, shiitake, trumpet, fresh or dried porcini)

2 Tbsp olive oil

2 carrots, diced

1 celery stalk, diced

1 medium white or yellow onion, diced

1 can precooked low sodium chickpeas (approximately 15.5 oz)

15 oz precooked chestnuts

2 ½ cups of vegetable broth

1 sprig of fresh rosemary

Salt & pepper to taste

1 hot pepper

Parsley, chopped

1.     Clean the mushrooms if using fresh, eliminating all dirt and cut all to approximately the same size. If you can find frozen mushrooms you can eliminate this step. You can substitute mushrooms and/or add some dried. I like the addition of approximately ½ - 1cup dried porcini for more flavor.

2.     In a large pot heat the olive oil and sautée together the carrots, celery, onion and parsley stems for about 5 minutes. Do this until the carrots begin to soften, adding about ¼ cup of broth to not brown too much the vegetables.

3.     Add the mushrooms, the rosemary sprig and the hot pepper keep stirring. Salt and pepper to taste. Cook for approximately 10 minutes.

4.     Remove the chickpeas from the can, throwing out the liquid; rinse and drain. Add to the mushrooms.

5.     Cut the chestnuts to be more or less the same size. And add to the mushrooms along with the rest of the broth. Bring to a boil. Cook for about 20 minutes until the soup thickens somewhat. I like to puree a few of the chickpeas and the chestnuts to help thicken if necessary. Remove the hot pepper. 

6.     Serve the soup in bowls, sprinkle with the parsley, and a little olive oil and freshly ground pepper if desired. 

WhatsApp Image 2020-12-10 at 2.30.44 PM.jpeg
First tried this recipe at a dear friend of mine in Rome. Couldn’t resist after to remake it!

First tried this recipe at a dear friend of mine in Rome. Couldn’t resist after to remake it!

WhatsApp Image 2020-12-10 at 2.31.42 PM-2.jpeg


Easy Christmas Fruit Cake Recipe

Easy Christmas Fruit Cake Recipe

This is an easier version of a traditional Christmas cake made in my family. The more traditional - more of a pudding cake takes hours to bake at low temperature and requires a lot of manual labor as the fruits must be fully incorporated into the batter gently by hand as it is incredibly thick. That cake requires a lot of patience and I prefer that recipe for petits fours, which I find taste better than chocolate truffles. I leave those to my mother and my sister Dawn. As Christmas cakes are full of wine, they last a long time so I just wait for my package from Miami, make myself a cappuccino sit back, relax and pop one of those little bits of temptation into my mouth. Ah! Love Jamaican Christmas desserts. This recipe is more of a traditional cake and is incredibly rich with a buttery port taste that makes me think of balmy breezes, palm trees and my favorites, pirates.

At one of my dear friend’s home and fellow Caribbean food blogger, Charmaine Lord, to create our holiday fruit cake.

 Preparation: 20 minutes || Baking: 1 hour || Serves: 10 - 12

14 oz. unsalted butter

2 ½ cups brown sugar

6 eggs       

2 ½ cups flour, sifted

4 tsp. baking powder

½ tsp. salt

2 tsp. vanilla

½ tsp nutmeg

1 cup port wine, drained from fruit – add if necessary to make 1 cup

3 cups port wine soaked dried fruit, drained (raisins, cherries, cranberries), ground

zest of 2 orange and 2 limes


Adjust the rack one-third up from the bottom of the oven. Preheat oven to 350F degrees. Butter a 9 x 2 ½ - inch cake tin, dusting it lightly with fine dry breadcrumbs.

In a large bowl and using an electric mixer beat the butter to soften.  Add the sugar and beat for another 2 to 3 minutes until fluffy. Add the eggs one at a time, scraping the bowl as necessary with a rubber spatula to keep mixture smooth. Sift together flour and baking powder, then add salt.  Sprinkle ½ cup of flour over the ground up fruit and fold in gently then set aside. Add the rest of the flour into the cake in three additions, alternating with the port. Do not over mix. Then by hand using a rubber spatula, incorporate the dried fruit and zest carefully into the batter. Turn the batter into the prepared pan and level top by rotating pan briskly back and forth. 

Bake for an hour in the middle of the oven.  Remove the cake from the oven and with a small metal spatula go around the sides. Cover the tin with a cake plate and invert. Bathe immediately with warm Citrus Syrup. Let cool and serve each slice with Vanilla Ice Cream or with Crème Anglaise

Mini teaser of the cake making recipe :

full video found on my IGTV @jacquiesfoodfortalk and Charmaine’s @charmaine_lord

Citrus Syrup

Makes approximately ½ cup of syrup

Preparation: 15 minutes

Juice of 1 lemons                    ½ -1 cup sugar (amount of juice = amount of sugar)

Juice of 1 orange                    1tsp Limoncello (or other citrus liquor), if desired

Juice of 2 limes

 Place all ingredients except the Limoncello in a small saucepan.  Cook at low heat, stirring frequently until the sugar dissolves.  Cook for another 5 minutes until the syrup thickens. Take off the heat and add the Limoncello, or for example Grand Marnier, if desired. Pour immediately approximately ¼ of the syrup over the top of the hot cake, then turn it over on a plate, and pour more syrup over the bottom and sides. Any remaining syrup can be refrigerated for up to about a week.

Note: If you do not have dried fruit casually soaking in your home, as you are probably not Jamaican nor for that matter West Indian, you could substitute the fruit with the bottled fruit – mincemeat - used for mince pies found in the supermarket. Then you will need 1 cup of port. Or you can quickly boil, in port, approximately 3 – 4 cups of dried fruit (raisins, cherries, prunes), until fruit is softened.

IMG_1981.jpg
IMG_1983.jpg

Thanksgiving Special: Curry Spatchcock Roast Chicken

Thanksgiving Special: Curry Spatchcock Roast Chicken

WhatsApp Image 2020-11-26 at 2.35.23 PM.jpeg

As I was preparing for Thanksgiving this year, I couldn’t decide whether I wanted to prepare a turkey or not. No one in family likes it – Jamaican-Italian – no. Then this year we were reduced to three and one only wants pasta, and the only part of the tradition he consumes is the cornbread and the stuffing. However, he was the only want who wanted the stuffing. My mother called me for a Jamaican recipe that she remembered was in one of the vintage (1963, vintage, right?) cookbooks in my collection. So, I pulled out A Merry Go Round of Recipes from Jamaica by Leila Brandon looking for a curry flavored chicken. What exactly did she mean by curry flavored? I came across a recipe for “curry flavoured baked chicken”. I assume since curry is usually a stew the idea that baked chicken was with curry was why the stem “flavoured” was used. I decided that I would do a chicken, but not a cutup chicken but a whole chicken, and my new favorite way of cooking it these days – spatchcocked. The original recipe called for the addition of paprika, but I prefer Allspice and a pinch of dry ginger was enough and I love flavor so the addition of thyme and bay leaf, not to mention onions, garlic and scallion were absolutely necessary, as were the hot peppers. Actually, it was one of the most delicious recipes that I have ever made. So now it will definitely be a part of my repertoire, with or without the curry. I think what I liked was the lack of sauces being used and you could use olive oil or another oil rather than butter, but the butter seemed decadent to me who basically use butter for desserts. I think this year I will be looking a lot at my old cookbooks. It will be a fun way of looking at ingredients and playing with them and seeing what I can get away with. But you know me, flavor, flavor, flavor. Salt and pepper could never be enough. Hope you enjoy this recipe. Let me know.

 ———- 

Curry Spatchcock Roast Chicken

 Preparation: 15 – 30 minutes; Season and marinade in refrigerator for up to 48 hours

Cooking: 1 hour


1 4 -5 lb. Chicken – spatchcock

Salt and pepper

2 Tbsp curry powder

1 tsp Allspice

2 Tbsp freshly grated ginger, or 1 Tbsp powdered ginger

1 medium white or yellow onion, diced

4 scallions (spring onions), diced

4 cloves garlic, diced

Sprigs of fresh thyme

4 bay leaf

Zest of 1 lemon – lemon can then be used for washing chicken

2- 3 whole hot peppers if desired

4 oz unsalted butter, melted just before going in the oven

1.     First clean carefully the chicken by cutting away as much fat as possible. If chicken is whole, remove the backbone. This can be saved for making gravy if desired or for chicken stock. Then clip the very top of the breastbone. I find this makes it easier to flatten the chicken. Wash thoroughly the chicken with vinegar then rinse with hot water. Then rub down the chicken with the lemon. Use more than one if desired. Dry carefully and place flat, meat side up, in a flat recipient that can go in the refrigerator.

2.     Combine all dry ingredients including herbs. Lift carefully the chicken skin on all parts of the chicken. Make sure it is dry. Using your hands, preferably with disposable rubber gloves as the curry stains, rub the mixture including all over the chicken, under the skin and all possible crevices. Place chicken in refrigerator covered if for two days. After the first day, uncover in the refrigerator until ready to roast. This will result in crisper skin.

3.     Remove chicken from the refrigerator and bring to room temperature about 20 minutes. Preheat oven to 375°F (190°C). The skin of the chicken should be dry. At this point brush the skin with the melted butter and place in the middle of the oven. Do not turn and bake for 60 minutes. The chicken will be moist and the skin crispy. Let sit for about 5 minutes before cutting up into 8 pieces. I like to slice the breast.

Note: As a Jamaican I am rigid about cleaning, and about disinfecting the work area after I am done. Also, if you are worried about the chicken being overcooked, that has never been an issue for me. As a matter of fact, I cook whole chickens for 90 minutes, but because it is spatchcock I only cook it for 60 minutes. I suspect that we are worried about bacteria and raw flesh as we are from a tropical climate. However, my way of cooking has always resulted in moist and juicy chicken. Enjoy.


WhatsApp Image 2020-11-26 at 6.53.11 PM.jpeg

Pasta Aumm Aumm

Pasta Aumm Aumm

WhatsApp Image 2020-09-18 at 5.50.39 AM.jpeg

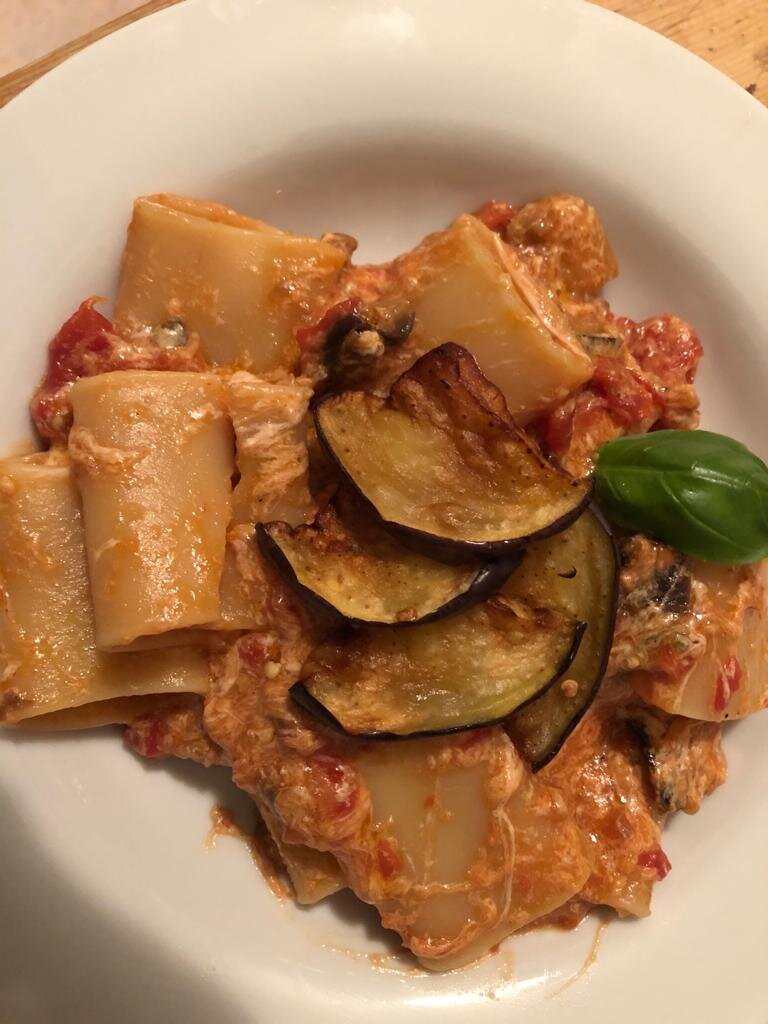
This is a favorite pasta from Capri that it took years for me to even attempt to make it.It seemed too complicated, and filled with so many steps. It is perfection, divine even when made properly, with the varying textures and layers of flavor. You can tell how good it is by the translation of Aumm Aumm, which means “Hush Hush”. I assume because it is so yummy delicious that no one has anything to say as they are all busy eating.

It contains a basic tomato sauce and I use canned peeled tomatoes, basil, garlic and olive oil. At the end is added cubes of scrumptious fried eggplant, creamy mozzarella (preferably smoked as I just learned this summer, that adds another element of flavor that is sublime), and the salty that is pecorino romano. It is a winner, although cleaning the pot at the end is not my favorite, but that gooey mess is totally worth it.

Pasta Aumm Aumm

Serves 12

Preparation: 30 - 45 minutes


 2 lbs pasta Paccheri

½  cup + 2 tsp. extra-virgin olive oil

2 large cloves of garlic, finely chopped

2 cans Pomodorini di Collina / cherry tomatoes (preferably San Marzano)

½ cup basil, silvered + 6 large leaves

¼ tsp. hot red pepper flakes (I prefer the flavor of powdered Jamaican country pepper)

2 large eggplants, cubed except for approximately 4 divided into 4 pieces each for 16 pieces (to be fried and set aside)

1 – 1 ½  cups of Mozzarella, grated

½  cup Pecorino Romano, grated

salt & pepper to taste


  1. Place all of the cutup eggplant into a large colander placed inside a large bowl so liquid can drop down. Salt them and leave for 30 minutes. Rinse off and dry. To begin preheat oven to 375º F. Prepare an oven tray with wax paper or aluminum foil. Place all the cubed eggplant into the tray, add olive oil and stir covering each piece and place in the oven for approximately 30 – 45 minutes depending on oven. Stir occasionally. You could also fry, which is the traditional method. The 16 remaining pieces should be fried and then set aside to decorate the final dish. 

  2. In the meantime, in a large skillet with a cover combine the olive oil with the garlic and the cut parsley stems.  Sauté for a few minutes. Add the tomatoes, basil and hot pepper and let cook slowly. Grind in black pepper and add salt. Let simmer slowly until ready to serve, stirring occasionally so that the sauce doesn’t stick at the bottom. When the roasted eggplant is ready add to the tomato sauce and stir.

  3. In the meantime, put the water on to boil, and add salt to the water once it reaches boiling point. When the water returns to a boil, add the pasta and let cook following the instructions on the box. Do remember to check for salt halfway through the cooking process. Always remember to keep some of the cooking water, as it is great to lighten up the sauce if it is too thick and it also helps to make it a bit creamier in texture, and to maintain the heat of the pasta when it arrives at the table. Do be careful about adding water however to pasta sauces with tomatoes.

  4. Mix the pasta and the sauce together, with the two cheeses and add a bit of the pasta water stirring carefully. Add the remaining basil together with a Tbsp or two of fresh olive oil. Pour the pasta into a dish. Scatter more pecorino romano as well as the remaining fried pieces of eggplant on top to decorate. Place bowls of pecorino romano on the table, but I doubt anyone will need more cheese. Is there any such thing as too much cheese? So yummy and cheesy!

 Buon Appetito!

WhatsApp Image 2020-09-18 at 5.50.39 AM-2.jpeg

Caribbean Shrimp Balls

Caribbean Shrimp Balls

Shrimp Balls - Donatella Codonesu.JPG

I love shrimp, I love fried food in general, and I really love appetizers. I could totally live on appetizers and forget everything else. In the summer as you can imagine, I am eating lots of seafood this summer in Italy, but what do I do in the cold months in New York? I love these fabulously tasty fried bites of shrimp with hearty and earthy Jamaican flavor. Serve simply with just hot sauce, or create an herb and ginger sauce, or an Asian flavored sauce, or go for a hot and spicy tomato sauce. All of these flavors will warm your heart and you will forget the cold, and recall summer breezes by the sea.

Caribbean Shrimp Balls

Serves 6 – 8 

Preparation with cleaning 1 hour

1 lb cleaned medium sized shrimp (deveined)

1 tsp powdered ginger, + 4 Tb juice of freshly grated

1 tsp allspice

½ tsp Jamaican Jerk Seasoning

1 garlic clove, diced

1 scallion, diced 

1 tsp soy sauce

1 tsp coconut oil

Salt & pepper to taste

If available, 2 Tbsp Jamaican Pickapepper sauce (can be substituted with tamarind sauce or Worcestershire sauce)

¼ cup chopped mint

¼ cup chopped cilantro

Lime zest

¼ cup all-purpose flour 

Coconut oil for frying

Wash the shrimp, dry and dice as small as possible. Mix all the other ingredients together - except for the flour - and add to shrimp. Leave to marinade for at least an hour in the refrigerator, better overnight. This allows the marinade to really soak in, enhancing the flavors. Add the flour, enough to make a sticky ball. Create the small balls and place in a tray covered with wax paper. Never leave seafood out if not ready to use, so cover and place tray in refrigerator. 

In a frying pan add coconut oil and wait until very hot. Do not overcook as you want the shrimp balls to be firm but moist, and not dried out, until golden brown. Fry in batches and place on a cookie rack, something I learned recently so they don’t become soggy. Plate and serve immediately with a green herb sauce, an Asian flavored sauce or a spicy hot tomato sauce.  

** If you can’t find Jerk Seasoning combine 2 Tbsp each of the following dry or ground ingredients: thyme, black pepper, allspice, garlic powder, ginger, onion powder, nutmeg, zest of lime, cinnamon. If you can’t find allspice add ½ tsp more of the following ground spices: cinnamon, nutmeg and ginger. 

RECIPE: COOKIES

vanilla cookies.JPG

Vanilla Cookies 

Makes 24 – 90 cookies depending on the cookie cutter size. 

Preparation: 15 minutes to mix

            ½ hour in the refrigerator

                     Cutting out and baking approximately ½ hour

2 sticks unsalted butter, at room temperature

¾ cups granulated sugar, or cane sugar

3 egg yolks

2 tsp Vanilla Extract 

2 ½ cups all-purpose flour, sifted
1 tsp baking powder 

½ tsp salt

In a bowl, using an electric mixer beat together the butter and sugar on medium speed until light and fluffy, about 4 minutes.  Beat in the egg yolks one at a time, beating well after each addition.  Add the Vanilla Extract and mix well (Add lemon zest and Lemon Curd here if doing the Lemon Cookies).

Sift together the flour and baking powder, then add salt.  Add to the butter mixture a little bit at a time at low speed, and beat well until well mixed.

Divide the dough into 2 equal parts.  Shape each into a ball. Flatten and wrap in parchment paper, and refrigerate for at least ½ hour.  The dough can be prepared up to 3 days ahead, and kept in the refrigerator. If so, place the dough in resealable plastic bags. Let it soften slightly at room temperature before continuing.

Preheat oven to 350 F.  You will need 2 – 4 nonstick cookie sheets, or line baking sheets with parchment paper. On a lightly floured work surface - I use parchment paper without the extra flour - roll out one piece of dough, approximately  1/8th inch in thickness.  Cut out desired shapes.  Transfer cutouts to the prepared baking sheets. Continue until all the dough is finished.

Bake until the cookies are golden and slightly darker on the bottom about 8 minutes.  Turn the tray halfway in the baking process.  Remove the cookies and let cool for about 1 minute. Transfer the cookies to the wire rack and let cool completely. Store in an airtight container at room temperature for up to one week. 

Variation: Lemon Cookies 

Substitute 2 tsp Lemon extract for Vanilla Extract

Add the zest of 1 Lemon

Add 2 Tbsp Lemon Curd (optional)

**Note: I like to measure out the dry ingredients and store in plastic containers so that on a whim I can bake cookies, as I find measuring the hardest part. It’s a cure for laziness and this way you are always prepared.

RECIPE: Sorrel Cocktails

RECIPE: Sorrel Cocktails

Unknown-5.jpeg

Sorrel I thought for a long time was totally a Jamaican thing. We make a special Christmas and New Year’s drink using the sepals. It is a flower, the Hibiscus (Hibiscus sabdariffa), in Spanish el flor de la Jamaica or roselle in other parts of the Caribbean, and is originally from Asia. It is not that bitter green leaf that Americans use sometimes for cooking. Yet recently, and possibly because of the growing strength of the celebration of Juneteenth in the United States I have learned that there is a red drink widely enjoyed in the southern states as part of their celebration. This red drink originated in West Africa, and especially Senegal and brought to America by African slaves. Red represents the blood shed during slavery and in West Africa is a color for special occasions and symbolizes spiritual power. The red is from bissap or hibiscus tea. This was confirmed one day one day by a Senegalese friend, Sharif, who asked me, “What do you know about sorrel?”  How much of a coincidence is that? I think we need a food historian or anthropologist to explain this. 

As children in Jamaica, my sister and I were made, and I do mean made, to sit and pull the sepals out. Our hands were blood red and sore by the end of the day. I certainly don’t remember it as being any fun. As an adult I realize that the red was from the sepals, and not actually blood, but as a child I guess gorier thoughts were much more entertaining.They were dried in the sun and then a tea was brewed together with spices of varying combinations (cloves, pimento, ginger, cinnamon, allspice) as well as cane sugar, orange peel and then left to steep for at least 24 hours. I prefer not to use all the spices with the exception of my favorite, the ginger, adding pimento and cloves, but I have given the measurements for tradition sake. At the end, and given it is a Jamaican recipe there is the addition of rum, to preserve or enhance. A tablespoon or so of rice is added to increase the fermentation. My sister Dawn uses a sweet red wine. I prefer a dry red like a chianti and a bit of Grand Marnier. So unlike West Africa, Jamaicans have always added alcohol to this drink. Then come New Year’s I like to add either a sparkling white like Prosecco or Champagne to make it more festive.

Sorrel is supposedly excellent for lowering your high blood pressure, is a natural diuretic and high in vitamins and minerals, an antioxidant and a great detox; the ginger is fantastic for digestion and a diuretic; the allspice(pimento or Jamaican pepper) gives the warm tones of cinnamon, nutmeg and cloves; and the lemon, lime and orange are an excellent source of vitamin C. It is an amazing drink without the alcohol. Fill a tall glass with ice and pour half way the sorrel and then top it off with sparkling water or seltzer. It is super refreshing. In the summer I drink it instead of ice tea. I love, love the flavor. Keep the drink refrigerated. It can last quite a long time and just keeps fermenting. Keeps about 2 – 3 weeks, depending on how addicted you are. I actually make it all year round and in the warm months love to make sorrel sorbet.


Sorrel Drink:

Preparation: 20 minutes + 24 hours to steep

5 cups dried sorrel

12 cups water

1 ½ - 2 cups of brown sugar, add to taste

Peel of one orange

4 inches ginger, grated, and squeeze out the juice

10 pimento seeds or allspice 

6 - 8 cloves

Juice of 1 orange, 2 lemons and 2 limes, add the peel or save for another use

1 Tbsp. rice, optional for additional fermentation

1 cup rum (preferably white Jamaican rum)

Orange, lemon and lime slices for garnish

Bring the water to boil with the brown sugar, stirring until the sugar is melted. Add the dried sorrel, ginger, cloves and allspice and cover, steeping overnight. Pour the sorrel batch through a sieve to eliminate the flowers. Then add the other ingredients and refrigerate. Sorrel is served cold. 

Variation:

I like to make a Christmas punch for my parties. For stronger flavor and reminiscent of Sangria, I add a couple bottles of dry red wine, and slices of oranges, limes and lemons. On New Year’s Eve instead I favor the addition of either Prosecco or Champagne. Laughingly we call it Caribini, you know, like a Caribbean Bellini.

Unknown-7.jpeg

My Christmas Punch

Add the following ingredients with the sorrel drink in a punchbowl:

½ cup Grand Marnier

1 – 2 bottles dry red white

My New Year’s Punch / Caribini

Add the following ingredients with the sorrel drink in a punchbowl:

¼ cup Grand Marnier

1 bottle of Champagne or Prosecco

To be honest the Caribini is my little cocktail that I like to serve if I have sorrel and champagne on hand. It is a wonderful way to welcome your guests. So instead of making a punch bowl directly, I place the sorrel in a glass pitcher and fill with slices of oranges, limes and lemons and add the Grand Marnier if desired. Fill halfway a champagne glass and then add either champagne or prosecco. I prefer not to add the Grand Marnier because if you have a guest who doesn’t drink alcohol you can add seltzer or sparkling water instead for a lovely bubbly feeling. Enjoy the party.

Summer Sorrel Drink

For a cool refreshing and fun alternative to lemonade, add the following ingredients to a tall glass:

1 scoop sorrel sherbet (p. )

fill glass with sparkling water or seltzer

Place a half slice of orange on the rim of the glass and add a sprig of mint

Unknown-3.jpeg
Unknown.jpeg


RECIPE: PASTA WITH MUSHROOM SAUCE

RECIPE: PASTA WITH MUSHROOM SAUCE

WhatsApp Image 2020-06-14 at 11.30.44 AM.jpeg

Pasta with Mushroom Sauce

Preparation: 30 minutes

Servings: 12

 2 lbs pasta Cavatappi, or another short pasta shape

3 packets of mixed mushrooms or my favorite Shiitake (approximately 24 oz.)

2 Tbsp. extra-virgin olive oil

1 clove of garlic, finely chopped

1 scallion, diced

½ - 1 cup parsley, cut finely and save the stems

salt & pepper to taste

dash or two of red pepper flakes (I’m Jamaican, can’t help myself)

2 Tbsp. Parmiggiano, + place filled bowls on the table

In a skillet combine the olive oil with the garlic, scallion and the chopped parsley leaves. Sauté for a few minutes.

Add the mushrooms and sauté. You can use the mushrooms of your choice. Season with salt and pepper, and if you like a dash or two of hot pepper flakes, and add some of the parsley. Save the rest for the end. Cook, stirring occasionally. It takes approximately 10 minutes.

In the meantime, put the water on to boil, and add salt to the water once it reaches boiling point. When the water returns to a boil, add the pasta and let cook following the instructions on the box. Do remember to check for salt halfway through the cooking process. 

Remember to add some of the cooking water as in this case it adds a little density to the sauce making it a bit creamier in texture mixing it in together with some of the parmiggiano, stirring always, and to maintain the heat of the pasta when it arrives at the table. I like to add my pasta to the sauce, as then the pasta soaks up all the sauce and bits and pieces in the pan. 

Add also if you feel it is necessary about a Tbsp. or two of fresh olive oil stirring it in carefully. It adds more flavor and gives a nice gloss to the pasta.  Pour the pasta into a dish. Scatter the remaining parsley and parmiggiano on top and serve. Don’t forget to place bowls of cheese on the table if desired.

Buon Appetito

Suggestions:

Other favorite pastas are Farfalle or Rigatoni, but there are many more. If you haven’t realized this as yet, this is great served as a side dish or on a bed of rice. The flavors are lovely and depending on the mushrooms used go from subtle to intense, but always earthy. 

I like this with a salad and lots of warm garlic bread. 

RECIPE: Lime Pear Tart

RECIPE: Lime Pear Tart

Photo: Melissa Hom

Photo: Melissa Hom

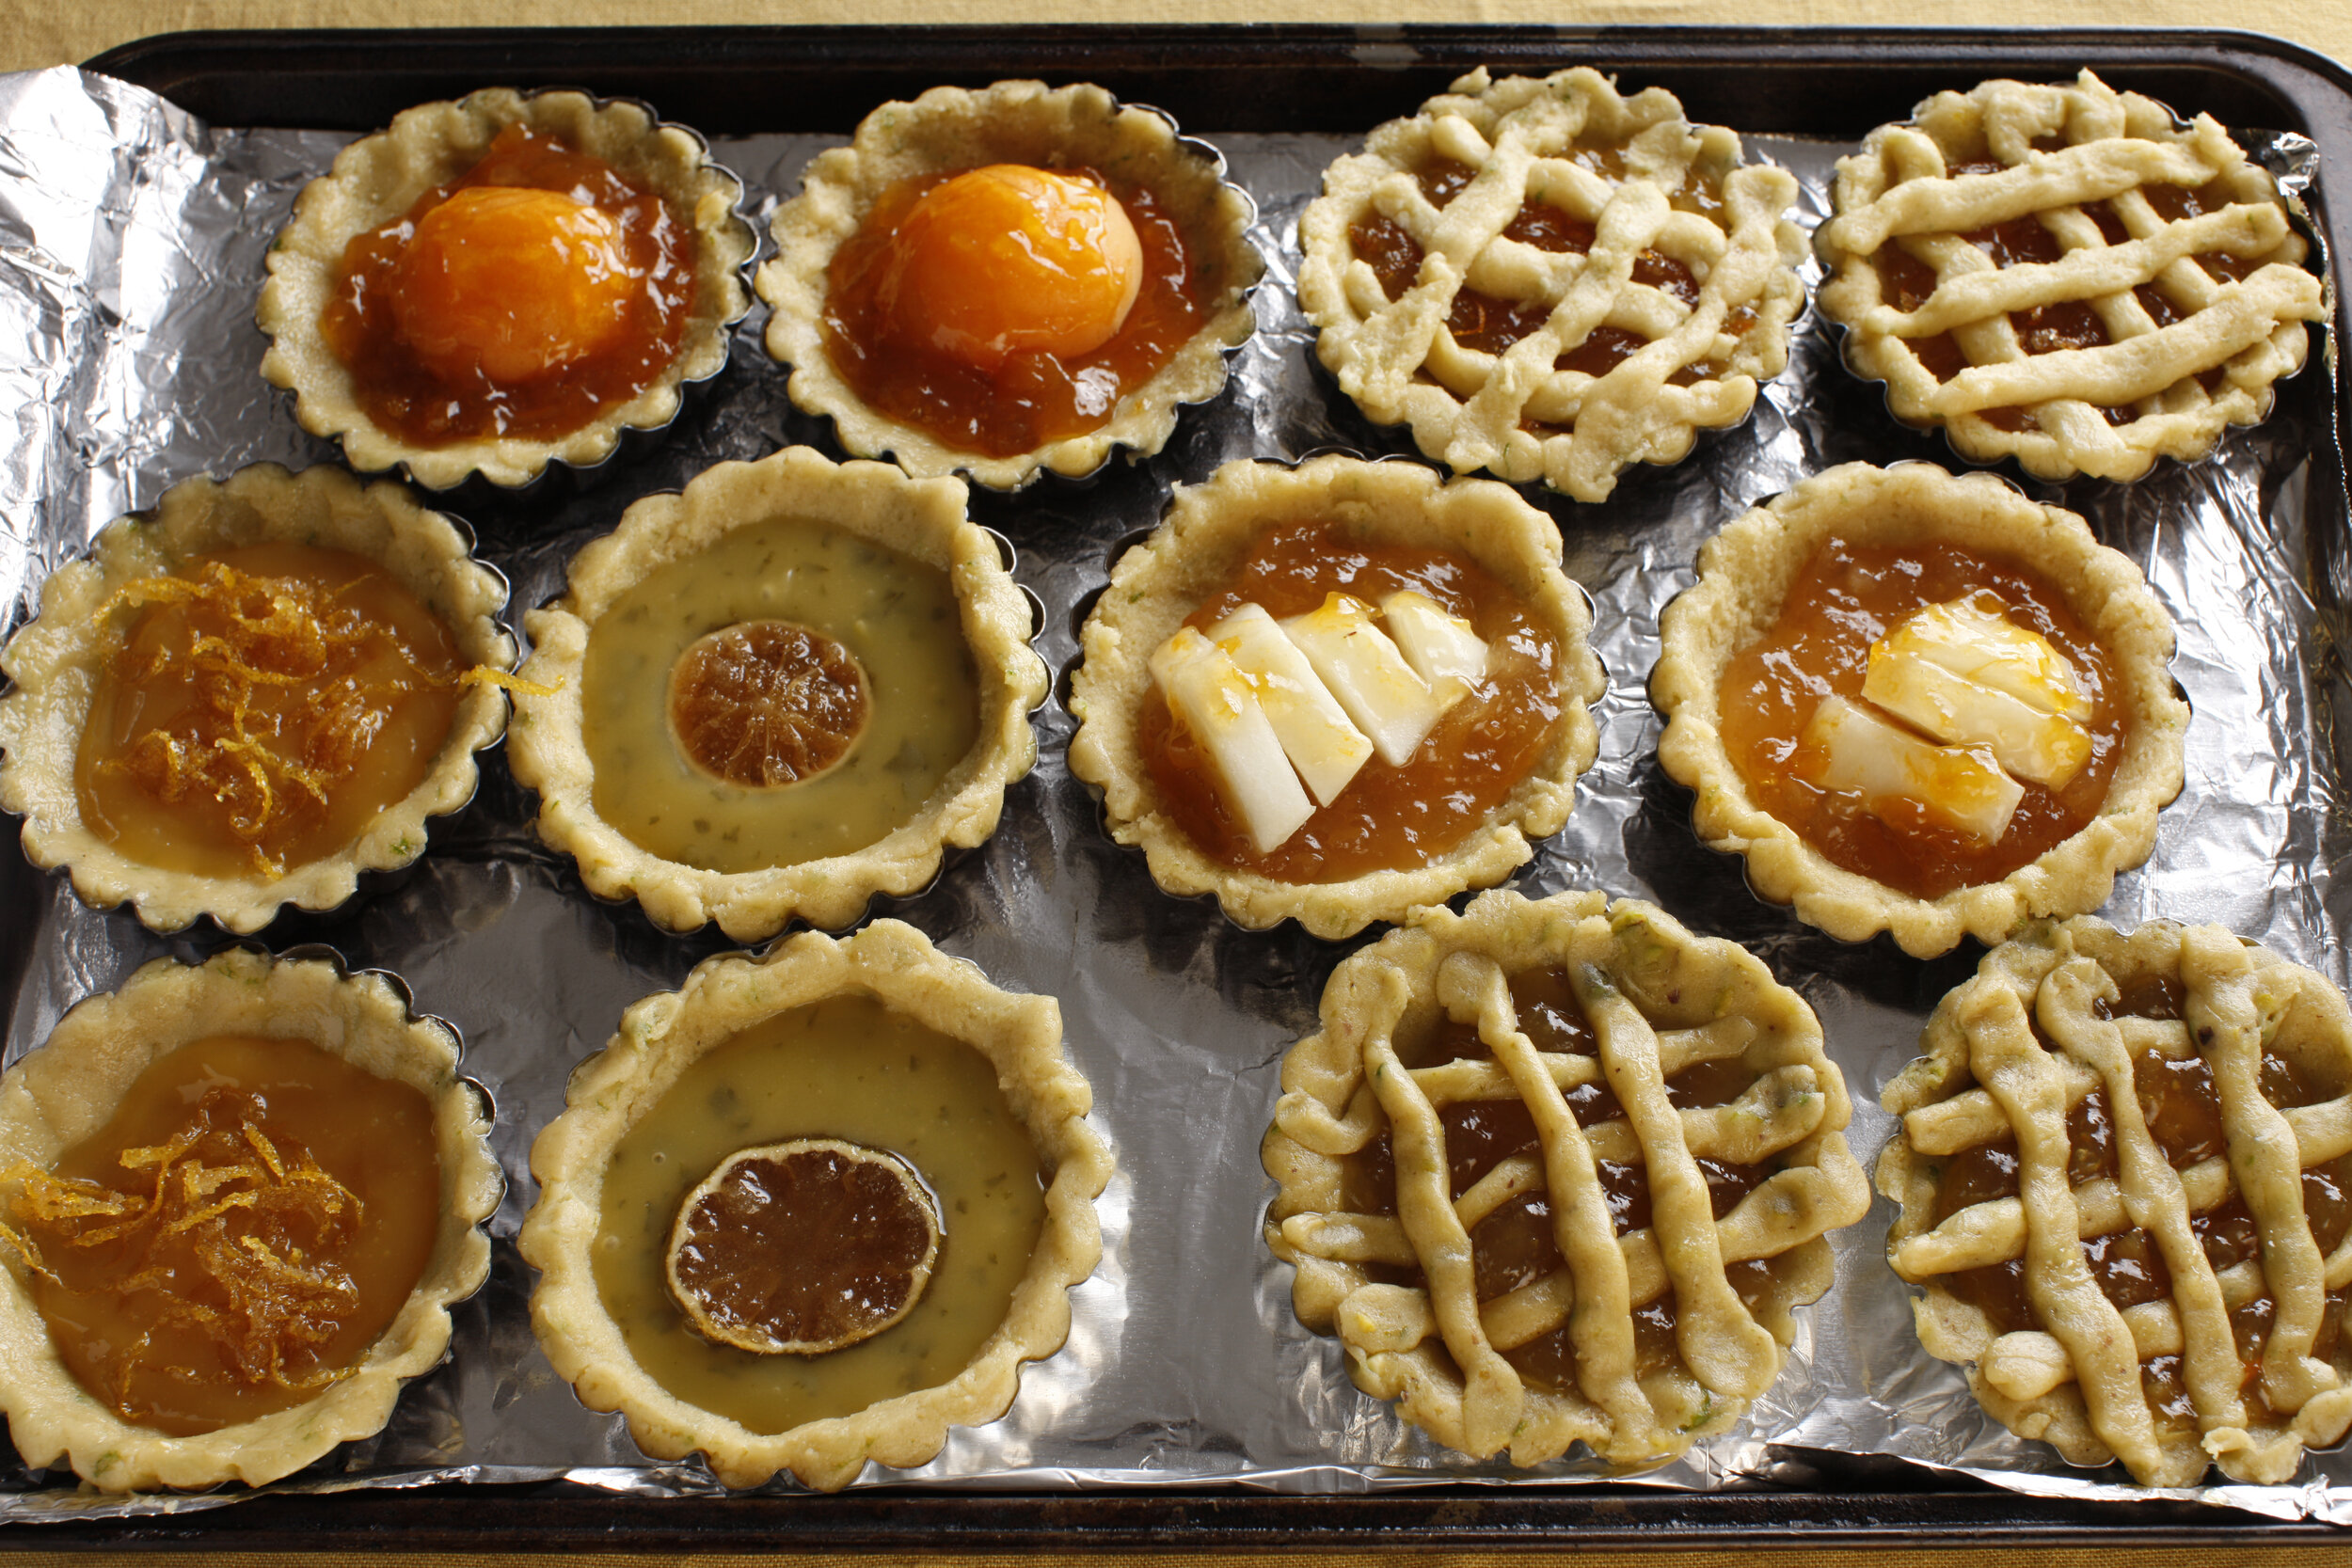
Summer is coming and I really like a pie with ice cream or sorbet. If you have homemade jams or fabulous organic specialty jams you can have have a lot of fun creating little tartlets with fresh fruit added. I prefer the less sugary jams as the fruit if in season gives so much flavor. I like decorating them with candied orange zest, candied slice of lemon or pieces of fruit.  

Lime Pear Tart or Tartlets

Makes – 1 – 11” tart or 12 3” tartlets

Preparation:

15 minutes to mix

½ hour in the refrigerator

Preparation and baking approximately ½ hour

Ingrediants:

2 sticks unsalted butter, at room temperature

¾ cups granulated sugar

2 yolks

2 tsp. Madagascar vanilla extract 

2 ½ cups all-purpose flour, sifted

1 tsp. baking powder 

½ tsp. salt

zest 1 lime

4 – 5 pears, sliced thin and tossed with sugar + 1 Tbsp. melted butter

20-oz of Pear Jam (I use the brand St. Dalfour)

In a bowl, using an electric mixer beat together the butter and sugar on medium speed until light and fluffy, about 4 minutes.  Beat in the yolks one at a time, beating well after each addition.  Add the vanilla extract and mix well.

Sift together the flour and baking powder, then add salt and zest.  Add to the butter mixture a little bit at a time at low speed, and beat well until well mixed.

Shape the dough into a ball. Flatten and wrap in parchment paper, and refrigerate for at least ½ hour.  The dough can be prepared up to 3 days ahead, and kept in the refrigerator.  Let it soften slightly at room temperature before continuing.

Preheat oven to 350 F.  The tart will be placed on the highest shelf of the oven so as to not get too brown. Prepare a nonstick tart pan by spraying with a nonstick spray. When ready remove approximately 1/4th of the dough and keep in the refrigerator until ready to be used. 

Using your fingers the remaining dough should be pressed down into the pan and around the edges as evenly as possible. Remove any excess dough and save to decorate if desired, or make cookies. Cover the bottom with the marmalade. Cover the top of the tart decoratively with the slices of pear. Take the remaining dough from the fridge. Using some flour, as little as possible you can create a lattice on top or even use cookie cutters of your choice and decorate the top of the tart. Brush the top of the tart and the fruit with jam.

Bake for approximately 50 minutes. 

**Note: Obviously you can substitute the marmalade with another jam of choice. At times I like to add ½ cup nuts like ground macadamia, almond, pistachio or hazelnuts in the crust.

You can substitute the pear jam and sliced pears with seasonal fruit such as apricots, peaches, grapes, apples, figs and their corresponding jams. Pick your favorite fruit. Have fun baking!

tarts.jpg