Caribbean Tiramisù for All The Pretty Birds - Tamu McPherson

Caribbean Tiramisù for All The Pretty Birds - Tamu McPherson

Image by Kihoon Oh

Link to my conversation with Tamu McPherson found here.

It's not every day that there is an opportunity to be in the kitchen talking and laughing with the fabulous Tamu McPherson. I am one of the lucky few so far and it was an amazing and uplifting experience as we made my Caribbean Tiramisu recipe with its refreshing tangy  citrus flavors and tropical banana bread with spices. A fantastic experience baking and filming with Tamu as we talk about life experiences and get to eat our cake as well. Do try this recipe and let the sunshine in.

Caribbean Tiramisù

4 – 6 servings

1 Citrus Cake Recipe

2 cups Citrus Syrup – recipe follows

1 portion of Lemon Mascarpone Cream – recipe follows


Citrus Cake

Makes one 9” cake

Preparation: Active 15 minutes || Baking: 50 minutes

8 Tbs (1 stick) unsalted butter, soft          2 ½ cups flour

½ cup brown sugar                                   2 tsp baking powder

½ cup white sugar                                    ½ tsp salt

4 eggs                                                        ½ cup milk

1 tsp Madagascar vanilla                         8 drops of lemon juice

Zest one each, lemon, orange & lime


Preheat oven to 350 F. Cream the butter and sugar together for approximately 10 minutes. Add eggs one at a time beating only until eggs are incorporated into mixture.   Sift together the flour with all of the other dry ingredients. Gradually add the flour mixture to the batter, alternating with the milk that has been mixed with the lemon juice. The milk will be slightly curdled. Also add the lemon, lime, and orange zest, and save the remaining juice for making the syrup. Finally, add the vanilla. Pour into a prepared pan with butter and breadcrumbs, or butter and then a non-stick cooking spray. 

After the allotted cooking time, test for doneness by sticking a wooden skewer in the center. If still too moist, leave in the oven for another 5 minutes. Take the bread out of the oven and immediately pour on top and bottom of the cake some of the prepared citrus syrup.  This can be done even a day before assembling the dessert.

Citrus Syrup

Makes approximately 1 ½ cups of syrup

Preparation: 15 minutes

Juice of 3 lemons             

Juice of 2 oranges            

Juice of 3 limes

 1cup sugar

Place all ingredients in a small saucepan.  Cook at low heat, stirring frequently until the sugar dissolves.  Cook for another 5 minutes until the syrup thickens. Take off the heat. Pour immediately approximately ¼ of the syrup over the hot cake leaving approximately ¾ of the syrup to moisten the on all sides once it is cut into slices for the assembling of the dessert.


Lemon Mascarpone Cream

Preparation: 10 minutes

Large container of Mascarpone (approx. 500 gr.)         

8 egg yolks

1 cup sugar                                                                      

4 egg whites

Zest of 2 lemons, 2 limes and 1 orange                          

8 drops of lemon juice


Whip the egg yolks together with the sugar. Add the mascarpone and the lemon peel, continuing to mix all the ingredients together.  Apart, whip the egg whites until they hold a peak.  Add 8 - 10 drops of fresh lemon juice to the whites. In a few additions, gently fold in the whites.


Assembling the Tiramisù

 Preparation: 15 minutes

 Additional Ingredients:

2- 3 ripe mangos sliced, if desired          

2 cups of heavy whipping cream, whipped

1 cup pineapple chunks, if desired


Slice the cake in half around the middle. You can decide what type of dish to use, but it must have high sides. It doesn’t have to be transparent.  Take the first slices of cake and bathe gently on both sides with the syrup. Place in dish and cover with the mascarpone cream, followed by a layer of fruit if using. Repeat this step except for the fruit until the bowl is full. Add the whipped cream to the remaining mascarpone sauce. Cover the top completely with the cream.  Cover carefully with plastic wrap. You should then refrigerate the dessert until approximately 15 minutes before serving. Then decorate with lemon and lime zest sprinkled lightly on top (approximately two of each), which gives a lovely color contrast to the top.
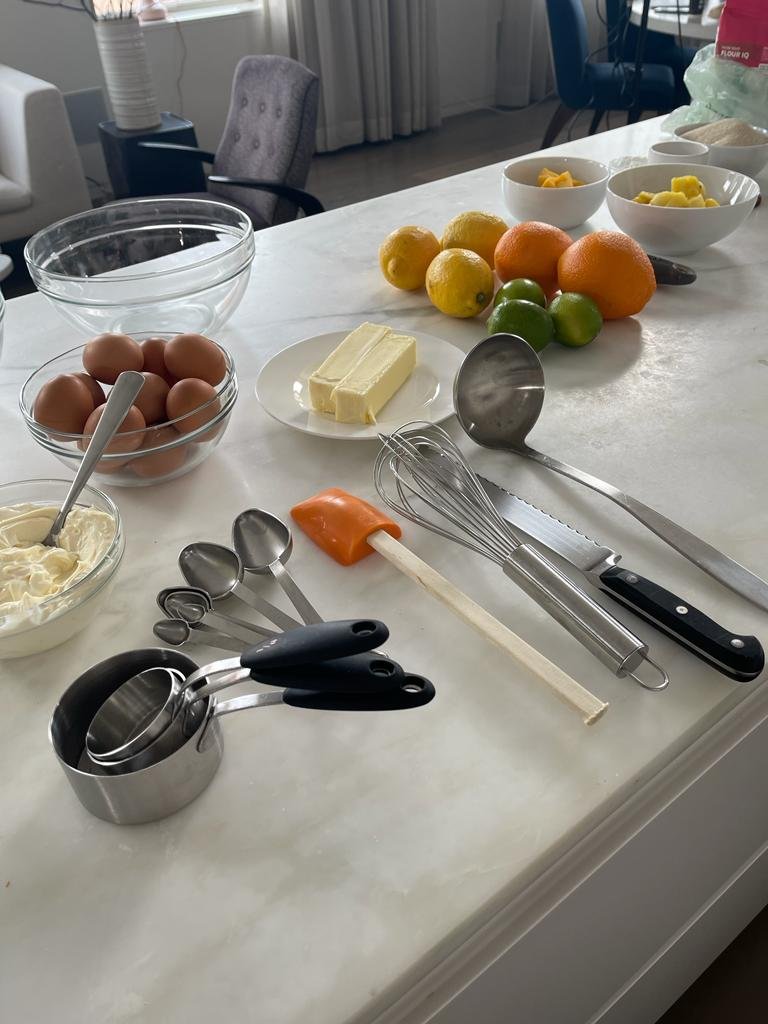
 

Shopping List

 12 large eggs, I prefer organic and brown

1 container Mascarpone, 500 grams

1-pint organic heavy cream

1 small container milk

16 oz (2 sticks) unsalted butter

3 lemons

3 limes

2 oranges

3 cups sugar

Baking powder

Salt

All-Purpose Flour

Small bottle liquid vanilla, Madagascar

1 cup ripe mango, cut up

1 cup pineapple, cup up


Tools

Measuring Spoons

Measuring Cups

Zester

Hand Whisk

Rubber Spatula

9” or 10” Cake Tin

2 - Large Mixing Bowls

Stand Mixer or Hand Mixer with Whisk

Large Breadknife

Ladle

Small saucepan

Parchment Paper

Large Round Glass Bowl or small round balloon glasses


Galette Recipe

Galette Recipe

Galette Smoked Mozzarella and Sliced Cherry Tomatoes

Serves 10 – 20 as appetizer

Preparation: Freezer – 1 hour

Refrigerator – 1 hour

Baking – 45 minutes


Pastry:

2 ½ cup all-purpose flour

½ tsp. salt

2 stick (1 cup) cold unsalted butter, cut into eight pieces

3 Tbsp. crème fraîche or plain Greek yogurt

½ cup very cold water


Egg wash:

1 egg, beaten

1 tsp. water


Filling:

1 Tbsp. crème fraiche or plain Greek yogurt (optional)

2 Tbsp. pesto

1 ½ cups smoked mozzarella, grated

2 cups cherry tomatoes, sliced thinly on the round, season with salt, pepper and olive oil


1.  Mix the flour and the salt together in a small plastic container and freeze for at least an hour.

2. Using a food processor and the pulse button blend together the flour and the cold butter until the butter is evenly distributed within the flour. This makes the pastry really flaky. In a small measuring cup, mix together the cold water and crème fraîche. Pour into the flour and mix first with a wooden spoon until all the ingredients are fairly well mixed. Finish off with your hands, as you do not want to overdo, and form into a ball. Flatten the ball into a disc and wrap in parchment paper and place in the fridge for at least 1 hour.

3. When ready preheat the oven to 375º F. Open the parchment paper and lightly flour the surface around and beneath the disc. Roll out the dough into a large round about 12 to 14 inches wide.

4. Place the parchment paper with the dough on a metal tray. If using spread crème fraîche or yogurt on the dough but leave approximately 1-inch border. Spread the pesto on top of this mixture and then sprinkle evenly with the cheese. Place the tomato slices carefully to cover the surface. I prefer to use different colored tomatoes to make it playful and fun. Fold the border edges of the dough inwards for about 1-inch exposing the center. Brush the edges with the egg wash. Season with salt and pepper if desired.

5. Bake 45 minutes until crust is golden. Remove from the oven and cool for a few minutes. Slice like a pizza or cut into squares.


Notes: I now tend to keep small plastic containers of the dry ingredients mixed in the freezer, as this is an easy dish to prepare at the last minute as it can be served hot. I add 1 Tbsp. sugar if I decide to make a sweet galette. As I also make this gluten free using a garbanzo/fava flour, Do label the container. This is a great versatile dish that you can make using a combination of rich and varied flavors from different pestos and cheeses, to grilled vegetables and herbs. Favorite jams and cut fresh sweet juicy fruit also work beautifully. Think of this, as a flaky more chic version of the pizza, so I think your pizza toppings would work quite well. It can be served as an appetizer, as well as a simple but elegant supper together with a heart warming cup or bowl of your favorite soup and a spritely mixed salad of herbs and baby lettuce. As a dessert serve it warm with a scoop of your favorite ice cream.


Beet Recipe

Beet Recipe

A couple of months ago a friend took me to lunch at a fabulous vegetarian restaurant here in New York City. The abcV a Jean-Georges restaurant, and like all his restaurants, doesn’t miss its target. As you know I don’t like vegetables, and the last thing I would do is go to a vegetarian restaurant. My friend has food issues, so I was happy to comply with her choice. She, knowing me was lovely and chose this wonderful restaurant, and although there was the possibility of farm fresh eggs, I asked her to choose our meal. Her favorite and mine as well was the Beet Tartare with avocado cream. A traditional Beef Tartare has the following ingredients: capers, onions, parsley, Dijon mustard and Worcestershire sauce. The Beets were just fabulous, and I honestly never eat Beef Tartare because I am not a fan of raw meat. The flavor of the beets was just unbelievable, and I wanted to make it at home. The tartare was served with a thick creamy avocado sauce, so I have added that here as well.


Beet Tartare

Serves 6 – 8 people as a side dish or can be served with crackers as an appetizer

Preparation: 60 – 90 minutes, can be done in stages and mixed at the last minute


4 medium sized Beets

1 Tsp. Capers

2 Tbsp diced Shallots

2 Tbsp diced Scallion

2 Tbsp. chopped fresh Parsley

2 Tbsp Dijon Mustard

1 Tsp. White Wine Vinegar

1 Tsp. Worcestershire sauce, or Pickapeppa Sauce (Jamaican sauce)

2 Tsp. extra-virgin Olive Oil + 2 Tsp. to roast the beets

Salt and Pepper to taste


Preheat the oven to 425° F. Wash carefully and dry the beets. I prefer golden beets to the red. Or you could mix the two, although the red will change the color of the other ingredients, so prepare separately and mix in the red right before serving. Place the beets – minus the tops - in a baking pan covered in foil. Pour 2 Tsp. of olive oil over the beets and season with a little oil and pepper, rubbing on all sides. Wrap in the foil and bake for 45 to 60 minutes. If the beets are not uniform, the larger beets will take longer so taste with a skewer. Remove from oven when ready, uncover and allow to cool. This step can be made even a couple of days ahead of time.


In a mixing bowl, place the capers, red onions, shallots, scallion, and parsley. Dice as small as you like the beets and add to the bowl. Remember if you are using both red and golden to add the red in at the last minute as it will change the color of the golden beets. Or you can just use red beets. For the dressing combine well the Dijon mustard, vinegar, Worcestershire or Pickapeppa sauce and the rest of the olive oil. Add salt and pepper. This could be made before and refrigerated, just remember to bring to room temperature and make sure that it is well combined. When ready add the dressing and toss your tartare.

 Note: I like to serve this as a side dish, and it is easily doubled if necessary. It could also be served as an appetizer with crackers, toasted bread or even on endives or lettuce cups.


If you wish to make the avocado sauce here is what I do:

1 small avocado, ripe

2 Tbsp. plain Greek yogurt

½ lime juice

1/8 cup cilantro, chopped very fine

1/8 cup mint, chopped very fine

Hot Pepper flakes, (optional)

Salt and Pepper to taste


Scoop out the flesh of the avocado and mix well with all the ingredients. You could do this in a blender, but I like it done with a fork as it is more rustic. Add more lime juice if you like and a dash or two of hot pepper flakes if desired.

If serving as an appetizer you can spread the avocado sauce on the crackers or toast before covering with the Beet Tartare. To avoid the crackers or toast getting soggy, place them on a tray and fill separate small dishes with the avocado cream and the Beet Tartare and your guests can serve themselves. You can also fill the endives or lettuce cups with the sauce and top with the Tartare.

RECIPE: Caribbean Coleslaw

RECIPE: Caribbean Coleslaw

This salad arose out of my desire to change things up. I was always making a salad of mixed baby greens, shredded carrots, and my very special dressing. Which I can tell you everyone loves. However, I rarely ate salad. I have always proclaimed that in Jamaica as a child there was never any salad, but cooked vegetables. Then I realized that every time I order prepared Jamaican food there is always coleslaw. Jamaicans love coleslaw and so I thought why don’t I make coleslaw? I didn’t want the typical sort of mayonnaise dressing but a lighter and more Asian influenced one. Now I make only this salad and love the hint of mint and sesame, crispy shallots for extra texture, and found that I love raw cabbage. Ginger also adds that extra bite. I was even thinking that some sliced hots peppers would be a good thing, but I am not sure anyone else would agree. Next time I will have a bowl of hot peppers on the table for the adventurous. Or am I just trying to cover the flavor of the vegetables? Could be…


Preparation: 30 minutes

Serves: 6 – 8


3 cups finely shredded or sliced White Cabbage

3 cups finely shredded or sliced Purple Cabbage

3 Carrots, finely julienned

2 Chocho/Chayote, finely julienned

1 bunch Mint leaves

1 cup finely julienned Scallion

½ cup crispy fried Shallots


Dressing:

3 Tbsp. White Wine Vinegar

1 Tbsp. Honey

2 Tbsp. Sesame Oil

2 Tbsp. Vegetable Oil (Safflower is what I use)

2 Tbsp. Black Sesame Seeds

½ Tsp. freshly grated Ginger

1 small Shallot, diced

1 Tsp. Dijon Mustard

½ Lime Juice

1 Tsp. Fish Sauce

1 Tsp. Salt

The Dressing can be made ahead of time. As can the vegetables be shredded and kept separately in containers in the refrigerator. The Scallion when julienned should be placed in cold water so that they curl naturally and lose some of the sharpness. An hour before serving mix all the ingredients together except the Mint leaves and the crispy fried Shallots. Right before serving add the Mint and some of the Shallots and toss well. Sprinkle the remaining crispy Shallots on top.

RECIPE: Orange Yogurt Cake

RECIPE: Orange Yogurt Cake

Recipe: Orange Yogurt Cake

I have been reading a lot of recipes lately and I have been trying to experiment with different ingredients. I love the combination of regular flour with semolina flour that makes the texture a bit gritty. Usually, these orange yogurt cakes with semolina all the recipes call for the substitution of butter with olive oil. In my home that was totally rejected. Butter is the champion for all desserts. I have to say that I totally agree being a lover of butter. This is not very different from other recipes, but I have been enjoying the new flavors and textures. I have also enjoyed the pleasure this cake has given to my family and friends.

Orange Yogurt Cake

Makes: 1 cake (8” x 3”)

Preparation: 20 minutes active | 50 minutes hour baking

1 ½ cups flour                                     3 eggs

½ cup semolina flour                                     8 Tbsp. (1 stick) unsalted butter, softened

2 tsp baking powder                                      ¾ cup Greek Yogurt, at least 5% fat

3/4 cup sugar                                     1 orange + 1 lemon, zested

½ tsp salt                                                        2 oranges, pulp and juice (remove rind of zested fruit)      

1 tsp vanilla


Preheat oven to 350 F.

Cream the butter and sugar together for approximately 10 minutes. Then add the eggs one at a time as well as the vanilla.

 Sift together both flours with all the other dry ingredients. Then add the lemon and orange zest. Use clean hands to rub the zest into the flour so that as much as possible the pieces separate into the flour. Your hands will warm the zest so that the oil will seep into the flour enhancing the flavor. (You can skip this if you like and add zest together with the orange pulp).

 Gradually add the flour mixture to the wet mixture, alternating with the yogurt. Finally, the orange pulp and juice, making sure that it is fully incorporated into the batter.

 Pour into a pan prepared with butter and breadcrumbs (or wax paper including around the sides, or a non-stick cooking spray. Bake, testing for doneness after the specified time. Put back in the oven if the skewer comes out moist for another 5 – 10 minutes. If done, continue to poke holes with a thin bamboo skewer all over the top of and through the cake, remove from pan immediately. Turn cake over in a plate, remove parchment paper if using then poke holes all over the bottom of and through the cake. Bathe while the cake is still hot the bottom and sides with half the hot citrus syrup. Carefully flip the cake back over into another plate – for serving. Using the rest of the hot syrup bathe the top and sides of the cake.

 Decorate as you wish once cool. My family likes just powdered sugar or a light citrus glaze.

 ***Note: You can change up the recipe by adding for example 2 very ripe bananas and only using 1 orange (pulp and juice) that are mashed and added together with the pulp. You will need to leave in the oven an extra 10 minutes as the banana adds additional moisture.

Citrus Syrup

Makes approximately 1 ½ cups of syrup | Preparation: 15 minutes

1 cup orange and lemon juice                      

1cup sugar

Cook at low heat, stirring frequently until the sugar dissolves.  Cook for another 5 minutes until the syrup thickens. Pour immediately approximately ½ of the syrup over the bottom of the hot cake, leaving the other ½ to moisten the top and sides of the cake.


Recipe: Broccoli Lemon Pasta

Recipe: Broccoli Lemon Pasta

Broccoli Lemon Pasta

One of the few vegetables I enjoy eating is broccoli and I love lemons, so why not put together the two in a very tasty vegetarian pasta dish. I don’t use any cheese as I am interested in the lemon, but cheese may be added. A more traditional broccoli pasta is usually with sausage and the dish should always have a hint of hot pepper. I have been known to use jerk sausage that really spices it up. However, this lemony recipe is all about the spring while the hearty sausage recipe makes me think of a cold winter’s night.

PREP TME!

Broccoli Lemon Pasta

Preparation: approximately 30 minutes || Serves 6 -8


1 lb. Orecchiette

2 heads (approx. 4 cups) of Broccoli, remove the stalks - can be saved and frozen to be used for soup

1/3 cup extra-virgin olive oil

1 clove of garlic, finely chopped

2 scallion, diced

¼ cup parsley, cut finely and save the stems

zest of 1 medium lemon

juice of ½ medium lemon

black pepper and salt as desired

red pepper flakes (optional)


Bring a large pot of water to boil. Add salt and the broccoli florets and boil for 5 minutes. Drain and cool. This could even be done the day before up to this point. Just refrigerate and bring to room temperature before preparing the sauce.

 In a large skillet with a cover add olive oil, and then the garlic, scallion and chopped parsley stems. Parsley stems add extra flavor to the oil together with the garlic and scallion. Sauté for a few minutes. Then add the broccoli, stirring constantly. Add salt and pepper to taste. This should take about 10 minutes. Add red pepper flakes if desired for a lovely contrast of flavors, spicy and earthy.

 Add some parsley, but reserve some for use prior to serving the pasta. Always taste before adding salt. Cook quickly as you don’t want the broccoli to lose its green color.

In the meantime, put the water on to boil. When it boils, add salt and then the pasta. I always use coarse salt from Trapani in Sicily. Remember it should be al dente and that you will need to cook the drained pasta with the sauce for a few more minutes before serving, so check on the box for the cooking time. If it says 9 - 11 minutes, cook 8 minutes if you are aiming for al dente, as you will continue cooking once the sauce is added. Also check for salt halfway through the cooking process. Always remember to keep some of the cooking water, as it is useful to lighten up the sauce if it is too thick and making it creamier in texture, and to maintain the heat of the pasta when it arrives at the table. Add a little to the broccoli together with the lemon juice and stir. Add a little olive oil if desired.

Drain the pasta and return to the pot, add the broccoli then stir in the remaining parsley and lemon zest. Serve immediately. You can serve grated Parmigiano Reggiano at the table for those who wish to add cheese.

***Note: to make a creamier version I like to blend about 1/3rd of the cooked broccoli with just enough pasta water. There is never any need for added butter or cream when you have starchy pasta water.

We deserve this treat after cooking this delicious meal…With my fellow cook, Charmaine Lord @charmaine_lord!

RECIPE: NCHIAMBARA

RECIPE: NCHIAMBARA

There are other ways of spelling this word for basically a fried flat bread or an eggless pancake with onions. However, the hardest thing besides trying to figure out what is the correct spelling – in my family it seemed as if everyone has another way of spelling it – is how do you pronounce this word. It seems as if the “N” is silent. However, don’t trust me on this one. It is one of those recipes that in all the decades that I have hung out with the Calabrian side (from Cosenza) of my Italian family has never come up. Perhaps because I was in the countryside an hour away from the city of Cosenza, beneath the mountains of Sila, in the summer with a large group of extended family and food fillers were needed to satisfy the varied generations grouped together. Besides me being Jamaican, there was the Neapolitan and a Roman as well, and four generations. So, with an older aunt steeped in local traditional recipes, a cousin who loves to cook, although she resided in Rome but with a very strong desire to maintain some traditions, this came out. I fell in love. How could I not, with a very simple recipe of flour, water, salt, and beautiful sweet red onions. Of course, they use the noteworthily delicious red onions of the Calabrian town Tropea, famous throughout Italy, and difficult to impossible to find outside of the region. In my New York kitchen I just make myself happy by using the red onions I can find, sometimes even mixing them with shallots. Such an easy recipe that is versatile and I will experiment a bit more with ingredients in the future. Right now, as it is a new addition to our menu, my half Calabrian is enjoying a bit of nostalgia so I will leave it as is, but as Autumn and then Winter come along, get ready to see a varied version from herbs, to vegetables being added in. What would you add in or substitute? How would you serve this? I would love to know.


Nchiambara – Calabrian or Cosentino Flat Bread

Preparation: 30 minutes

Cooking: approximately 20 minutes


1 medium red onion, slivered (approximately 1 - 1½ cups)

1 cup all-purpose flour (approximately 150 gr)

1 ½ cups of sparkling water (approximately 250 gr)

½ tsp salt, and a pinch to add to onions

Black pepper and or dry hot pepper to taste (optional)

Fresh thyme (optional; approximately 1 tsp)

Olive oil


Place a large nonstick frying pan on medium heat, and then cover the bottom with enough oil to cover the bottom. Pour the slivered onions into the pan and allow to soften. Stir occasionally not allowing them to burn. If desired add thyme (Jamaican addition as is the pepper). After approximately 10 minutes add a pinch of salt mixing well. Continue cooking until the onions are softened and slightly caramelized. Remove from the heat.  

Mix together the flour, water and salt, blending well with a whisk until the mix is similar to a pancake batter. Add the onions, leaving as much oil as possible in the pan. Stir well. Reheat the pan at medium-high heat and add more oil if needed. Pour the batter back into the pan, spreading out and patting down evenly so that the mixture covers the bottom of the pan like a large pancake. Let cook for approximately 5 minutes, lowering the heat if necessary. After 5 minutes using a plate (I use a light-weight metal pizza pan) to cover the pan, carefully flip over the bread and slip carefully into the pan. Flatten down again if necessary. Let cook for another 5 minutes until both sides are crispy and golden in color. Serve warm or at room temperature.

Note: I like to add about 1 – 2 Tbsps. of pecorino to the batter. Also, since I like mine rather crispy, I may cook an additional minute or two on either side. Cut in squares or triangles to serve as an appetizer or part of the meal. This is more or less the traditional recipe, but you might like to play with the ingredients substituting other aromatics or vegetables to the batter. I also love to serve it with a soft cheese like ricotta or labneh flavored with extra virgin olive oil, lemon zest or aromatic herbs and spices.


RECIPE: Caribbean Green Shrimp

RECIPE: Caribbean Green Shrimp

Caribbean Green Shrimp

Serves 6 – 8 || Preparation with cleaning 1 hour

 2 lbs. cleaned medium sized shrimp (deveined)

1 tsp powdered ginger, + 4 Tb juice of freshly grated

1 tsp allspice*

1 large garlic clove, diced

2 scallion, diced

Sprigs of fresh thyme, or 1 tsp dried thyme

1 Tbsp honey or lemon syrup

1 Tbsp soy sauce (or substitute with coconut aminos as I do)

1 Tbsp coconut oil + 1-2 Tbsp for frying shrimp

Salt & pepper to taste

3 Tbsp. green herb sauce (see below) + 2 tsp. for gravy

Zest of a lemon


Wash the shrimp and dry. Mix all the other ingredients together and add to shrimp. Leave to marinade for at least an hour in the refrigerator, better overnight and up to two days. This allows the marinade to soak in, really enhancing the flavors. Never leave seafood on the counter.

 In a frying pan, warm coconut oil, add diced garlic and scallion, more grated ginger and fresh thyme. Add the shrimp a few at a time, turning over once then removing and replacing as you go along, until all are ready. Do not overcook as you want the shrimp to be firm but moist, and not dried out. As you remove the shrimp, place them in a larger pan that allows you to evenly cook the shrimp when reheating. Remove any excess oil from the frying pan and add the remaining marinade as well as 2 tsp of green herb sauce to make a gravy. Stir and add a little water if marinade is too thick – about ¼ cup. Spoon gravy over shrimp and cover until ready to reheat, right before serving. Serve over rice or pasta and sprinkle with parsley or a mixture of mint and cilantro.

Green herb sauce – In a food processor Add the following ingredients:

1 scallion, grossly chopped,

1 medium garlic clove

1 thumb size fresh ginger

1 cup fresh mint leaves

1 cup fresh cilantro leaves

¼ cup olive oil

Salt and pepper to taste

*If you can’t find allspice add ½ tsp more of the following ground spices: the cinnamon, nutmeg and ginger.

WhatsApp Image 2021-03-31 at 1.58.54 PM-2.jpeg

RECIPE: Fettucine with Zucchini Pistachio Pesto

RECIPE: Fettucine with Zucchini Pistachio Pesto

Fettucine with Zucchini Pistachio Pesto

Preparation: 30 minutes || Serves: approximately 8 - 12

 This is one of the easiest pastas to make and only recently have I started to make it. This zucchini, fresh herbs – in this case mint and basil - and pistachios is easy and reminds me of Spring to come. I cannot wait for spring vegetables and fresh herbs that bring such joy. You also know my great love of lemon zest so at the end do add as it gives an extra pep to any dish. Being Jamaican, you know that the extra kick of hot pepper is absolutely a must, but feel free to leave out that dash or two of spiciness. Pestos are always great, because with a few simple ingredients and a whir or two, you are done. Remember that the quality of the ingredients is very important in Italian cooking, so don’t forget that you will need a great olive oil and save at least 1 cup of the pasta water for lightening the sauce but also the starch adds a creaminess to the sauce without adding cream or butter.  

I am giving you the recipe with Fettucine, but any fresh pasta would be fantastic. I am still perfecting making the southern pasta called scialatielli that I love – durum/semola flour, milk and salt. As soon as I have that perfected I will give you the recipe.  


2 lbs pasta

6 medium size zucchini, + 2 sliced and fried (optional)

1 ½ cups basil, washed and dried

1 ½ cups mint, washed and dried

1 medium clove of garlic, cut in half

1 cup toasted pistachios, ½ for the sauce and ½ set aside to toss in at the end (partially crushed)

¾ cup extra-virgin olive oil

salt and pepper to taste

1 lemon, zested

½ - 1 cup grated pecorino romano, + 1 cup to serve on the table

———

  1. Cut off the ends of the washed and dried zucchini, cut into three or four pieces and place in boiling salted water for approximately 5 minutes. Remove and let cool. If desired cut in half two zucchini and cut each into thin slices. Fry quickly until golden brown and set aside to be added at the end when sauce is added to the pasta.

  2. In a food processor add all of the ingredients except for the cheese, additional fried zucchini, lemon zest and pistachios. Add the olive oil as needed. Taste for salt, but remember you are adding cheese. Blend quickly. I prefer to let people add salt or additional cheese at the table. Add the cheese mixing well. You will add pasta water later.

  3. In the meantime, put the water on to boil. When it boils, add the salt to the water. When the water returns to a boil, add the pasta and let cook following the instructions on the box. Remember it should be al dente. Take seriously into consideration that especially with a pesto you will need to stir rapidly the drained pasta with the sauce for a few more minutes before serving to make it a bit creamier in texture, and to maintain the heat of the pasta when it arrives at the table. So, you may want to cut down by a minute or so on the actual cooking time. Before draining the pasta, I would set aside approximately 1 – 2 cups of pasta liquid. Slowly add approximately ½ cup to ¾ cup of cooking water to the sauce, but you want it to be creamy and loose, but not liquidy. You won’t need all the water but better to be safe than sorry. Do check for salt halfway through the cooking process.

  4. Return the drained pasta to the pot and slowly add the zucchini pesto. Add more pasta water if too thick. Before pouring the pasta into the serving platter add additional pistachios, lemon zest and a sprinkling of fresh olive oil and stir in. If using the additional fried zucchini mix into the pasta as well. Don’t forget a beautiful cluster of basil and mint leaves on top and serve immediately.

Buon Appetito!

WhatsApp Image 2021-03-03 at 6.47.31 PM.jpeg

Recipe Chicken Prosciutto Sage Rolls – Saltimbocca

Recipe Chicken Prosciutto Sage Rolls – Saltimbocca

In Italy, the Saltimbocca is usually made with veal and prosciutto with a sage leaf. Since chicken is more economic, and to be honest I find veal to be on the tough side, I started using chicken breasts. Also, because I can never stick to one flavor being overly partial to the layering of flavors, I decided to make the sauce and to put a number of my favorite flavors and aromatic herbs in. Sage and rosemary seemed to be the perfect fit and the ginger and hot pepper gives a lovely bite. I have since played with flavors by making it less European and more Latino by substituting the sage and rosemary with cilantro and mint. Love that combination as well. I think the next time I might even try it leaning towards Jamaica with a Jerk flavor or even more towards Asia. I think this recipe is open to your imagination and curiosity.

For at least twenty years now this dish has been a staple entrée on my party menus. It is a favorite that never fails and is extremely tasty ensuring that everyone is very happy. I sometimes substitute thighs for breast, but if you can marinate the breast for the two days as suggested before using, the texture and moisture is amazing, and your guests won’t be able to tell the difference between the two parts of the chicken. The thigh, however, should be marinated at least 6 hours to a day. Flavor is always the end goal. This is definitely an easy recipe that you can prepare ahead of time, even partially cooking and then finishing off in the oven.

 ——-

Chicken Prosciutto Sage Rolls – Saltimbocca

Serves – 8 - 10 || Preparation: 30 minutes + seasoning overnight and up to three days

 8 chicken breasts (approximately 4 oz. each – 2 lbs.), sliced and pounded as thin as possible

Salt & pepper

½ tsp ground ginger

½ tsp ground allspice

Dash or 2 of hot pepper flakes (optional)

½ - ¾ cup of sage-rosemary-ginger sauce

8 paper thin slices of prosciutto

16 large to medium sage leaves, washed and dried

8 - approximately 1-foot kitchen string

Olive oil, for frying

3 sprigs of rosemary

6 sage leaves


Sage-Rosemary-Ginger Sauce

Makes about 1 cup || Preparation: 15 minutes

1 cup fresh sage leaves, washed and dried

½ cup fresh rosemary leaves, washed and dried

2 scallion stalks, roughly diced

1 large garlic clove, cut into 4 pieces

2 – 3 inches ginger, cleaned and cut into smaller pieces

1 Tbsp. Dijon mustard

½ cup virgin olive oil

2 Tbsp soy sauce (I use coconut amino)

2 Tbsp citrus syrup (use honey as a substitute)

salt and pepper to taste


Place all ingredients into a blender or food processor and blend until whipped into a sauce. Additional olive oil may be added depending on desired thickness.

Recipe for the Chicken Rolls

1.      Wash and dry carefully the chicken pieces. Season with the dry seasoning followed by the sauce, making sure to leave some of the sauce to make gravy.

2.     Place in a container and leave from 6 hours to 2 days marinating in the refrigerator. 

3.    Remove from the refrigerator, place a slice of prosciutto and two sage leaves flat on the chicken. Then roll carefully and wrap the string around the chicken and tie the two ends together so that the chicken remains closed. I prefer kitchen string to toothpicks as it is easier when browning the chicken rolls. At this point you can place chicken in the container with the marinade and return to the refrigerator if not needed immediately. I like to do this the day before.

4.     Chicken should be at room temperature. Any marinade and juices from the chicken should be added to a small saucepan together with the remaining sauce. I add about a ½ cup of cold water and at low heat uncovered for abut 10 minutes until reduced. Add additional salt and pepper if desired.

5.     When ready heat a skillet, then add enough olive oil to cover the bottom of the skillet. Put a few sage leaves and a sprig of rosemary in the pan to flavor the oil. If the skillet is large enough, place all the chicken in the hot oil. Brown the chicken but be careful to not burn. Using tongs, turn on all sides so that the pieces are even in color. Place on a prepared baking sheet and cover. Then place in oven heated at 350°F for approximately 20 minutes to make sure that the interior of the chicken is properly cooked. This is why it is important to have all the pieces more or less the same size. Uncover for the last 10 minutes.

6.    Remove the chicken from the oven and let sit for about 5 – 10 minutes to allow for it to cool. Carefully using kitchen scissors remove the strings. If you wish you can serve each person an individual roll. I prefer to slice the rolls and place on a serving platter. Spoon the juices from the baking sheet over the chicken and serve the gravy separately. I find that my guests prefer this practice. Decorate with fresh rosemary sprigs and sage leaves.

I hope you enjoy this recipe !

Photo by Melissa Hom

Photo by Melissa Hom

Recipe: Chocolate Chip & Pistachio Cookies

Recipe: Chocolate Chip & Pistachio Cookies

Chocolate Chip & Pistachio Cookies

Makes approximately 24 - 70 cookies depending on the scoop size.

Preparation: 15 minutes to mix | ½ hour in the refrigerator | Cutting out and baking approximately ½ hour

 2 sticks unsalted butter, at room temperature

¾ cups granulated sugar

2 egg

2 tsp Vanilla Extract

2 ½ cups all-purpose flour, sifted
1 tsp baking powder

½ tsp salt

1 bag (12 oz) chocolate chips (dark, milk or white chocolate – your choice)

1 cup pistachios, roughly ground

 ——-

In a bowl, using an electric mixer beat together the butter and sugar on medium speed until light and fluffy, about 4 minutes.  Beat in the eggs one at a time, beating well after each addition.  Add the Vanilla Extract and mix well.

Sift together the flour and baking powder, then add salt.  Add to the butter mixture a little bit at a time at low speed and beat well until well mixed. At this point add the chocolate chips and pistachios.

Divide the dough into 2 equal parts.  Shape each into a ball. Flatten and wrap in parchment paper and refrigerate for at least ½ hour.  The dough can be prepared up to 3 days ahead and kept in the refrigerator.  Let it soften slightly at room temperature before continuing.

Preheat oven to 350F.  You will need 2 – 4 nonstick cookie sheets, or line baking sheets with parchment paper. Using a teaspoon or a small scoop fill the prepared baking sheets. Continue until all the dough is finished. Using a fork, smash each cookie twice in a criss cross fashion so that the cookies will bake more evenly.

Bake until the cookies are golden and slightly darker on the bottom about 8 minutes.  Turn the tray halfway in the baking process.  Remove the cookies and let cool for about 1 minute. Transfer the cookies to the wire rack and let cool completely. Store in an airtight container at room temperature for up to one week.


chocolatechip and  pistacchiocookiedough.jpg
WhatsApp Image 2021-01-27 at 5.18.35 PM.jpeg

Recipe: Mini Cupcakes

Recipe: Mini Cupcakes

My Mini Cupcake Recipe

I love these little bites of indulgence, of sweetness that give brings the right amount of sugar to my palate that is more attracted to the salty and tart. I have lots of ideas of how I want to proceed with different flavors, but this is the basic recipe. I assure you that they are quite addictive, but quick to make so you can actually indulge yourself every day with a new batch. If you are like me, I have little plastic containers with the dry ingredients measured out for recipes – cake, cookies, bread, focaccia, crackers, mini cupcakes… This way when I feel an urge to make something, I already have my dry ingredients ready, the part that I find boring. In fact, on lazy days I measure out dry ingredients so that I can feel quite accomplished for the day. Then when I want to bake, I am so satisfied with myself for being prepared.

 The great thing about this recipe is that it can be totally done by hand with the full proof method of mixing dry ingredients together, liquid ingredients together (melt the butter) and then combining the two. Really easy. Please enjoy these little bites for the utter joy of the ease in making them – non bakers this is a great start and can make even the accomplished bakers sit up and acknowledge your greatness. In my home we go for simplicity, so a dash of confectionery sugar is the only decoration, more sugar required is appeased by the addition of fresh fruit. I have added berries to the batter as well. However, kick it up a notch with icing, whipped cream, crème fraiche, jams and preserves etc. I on the other hand, am thinking about other flavors, a salty version, for instance a carrot and/or zucchini. Since I am not a great fan of vegetables, funnily enough I am always thinking of ways to add vegetables to my diet. So, let me know what you think. For my gluten free friends, I have also made these with rice flour that were delicious, and the amount of flour was the same.

 Enjoy, and try not to be like me, of the 30 mini cupcakes I made yesterday, I think I ate 10 or more, but I refused to count. Let me continue to delude myself that I don’t like sweets.

 ———-

Mini Cupcake Indulgences for the Non-Sweet Tooth

Preparation: 10 minutes prep + 14 minutes baking

Amount: approximately 30 mini cupcakes

1 ¼ cup all-purpose flour

1 tsp baking powder

¼ tsp salt

Scant ¾ cup cane sugar

½ tsp nutmeg (I use freshly grated Jamaican nutmeg – optional)

Zest of 1 orange

¼ cup unsalted butter, melted

2 eggs, at room temperature

1 tsp vanilla extract

1 tsp orange extract (optional)

½ cup milk

Confectionary sugar (optional)


Preheat the oven to 350°F.

Mix all of the dry ingredients together with a whisk. Then do the same with the liquid ingredients. Combine the two.

Place mini cupcake paper cups into the cupcake tin (mine were 1.37”). Fill approximately ¾ of the cup as you don’t want them to overflow.

 Bake for 14 minutes depending on your oven.

 Remove from oven, let cool. Decorate as you wish, or do a sprinkling of confectionery sugar.

WhatsApp Image 2021-01-16 at 7.56.57 PM.jpeg
WhatsApp Image 2021-01-16 at 8.03.41 PM.jpeg